
Setting Up My Home Office to Teach Online for $4,905
This is the post I wish I had when I was just getting started, struggling to figure out what investments I should be making to transform my home office into a teaching studio in order to teach online.
I fully realize that not everyone is looking to invest this much in an online studio. But for me, teaching professionally is my career and intend to do it for a long time. I didn’t view this as an expense for a temporary teaching solution, but an investment in a long-term, income-generating asset.
For those looking for more cost-effective solutions, I’m also including recommendations below for a $1,000 and $100 budget.
My goal was to set up a dual-purpose home office that would:
- enable me to deliver a world-class online course, and;
- function as my day-to-day desk for getting all other work done.
What makes this post different is that I am in the middle of my journey in the transition to online teaching which means that I remember what it’s like to feel overwhelmed by it all. I’m also not being paid to write this post, and none of these links are affiliate links so you’re getting my completely unbiased reviews on these products.
My aim with this post is to answer:
- What investments should I be making in the move to teaching online?
- What are the 80/20: the top investments that have had the biggest impact?
- What were the biggest wastes of time and money?
- What would you do differently if you were starting fresh today?
- If you had a budget of $1,000 what should you spend it on?
- If you had a budget of $100 what should you spend it on?
TL;DR: Here’s a document listing all of the investments that I’ve made.
In all of my homework, I’ve realized that production value, and technology investments can’t make a great course on their own, but they can break it.
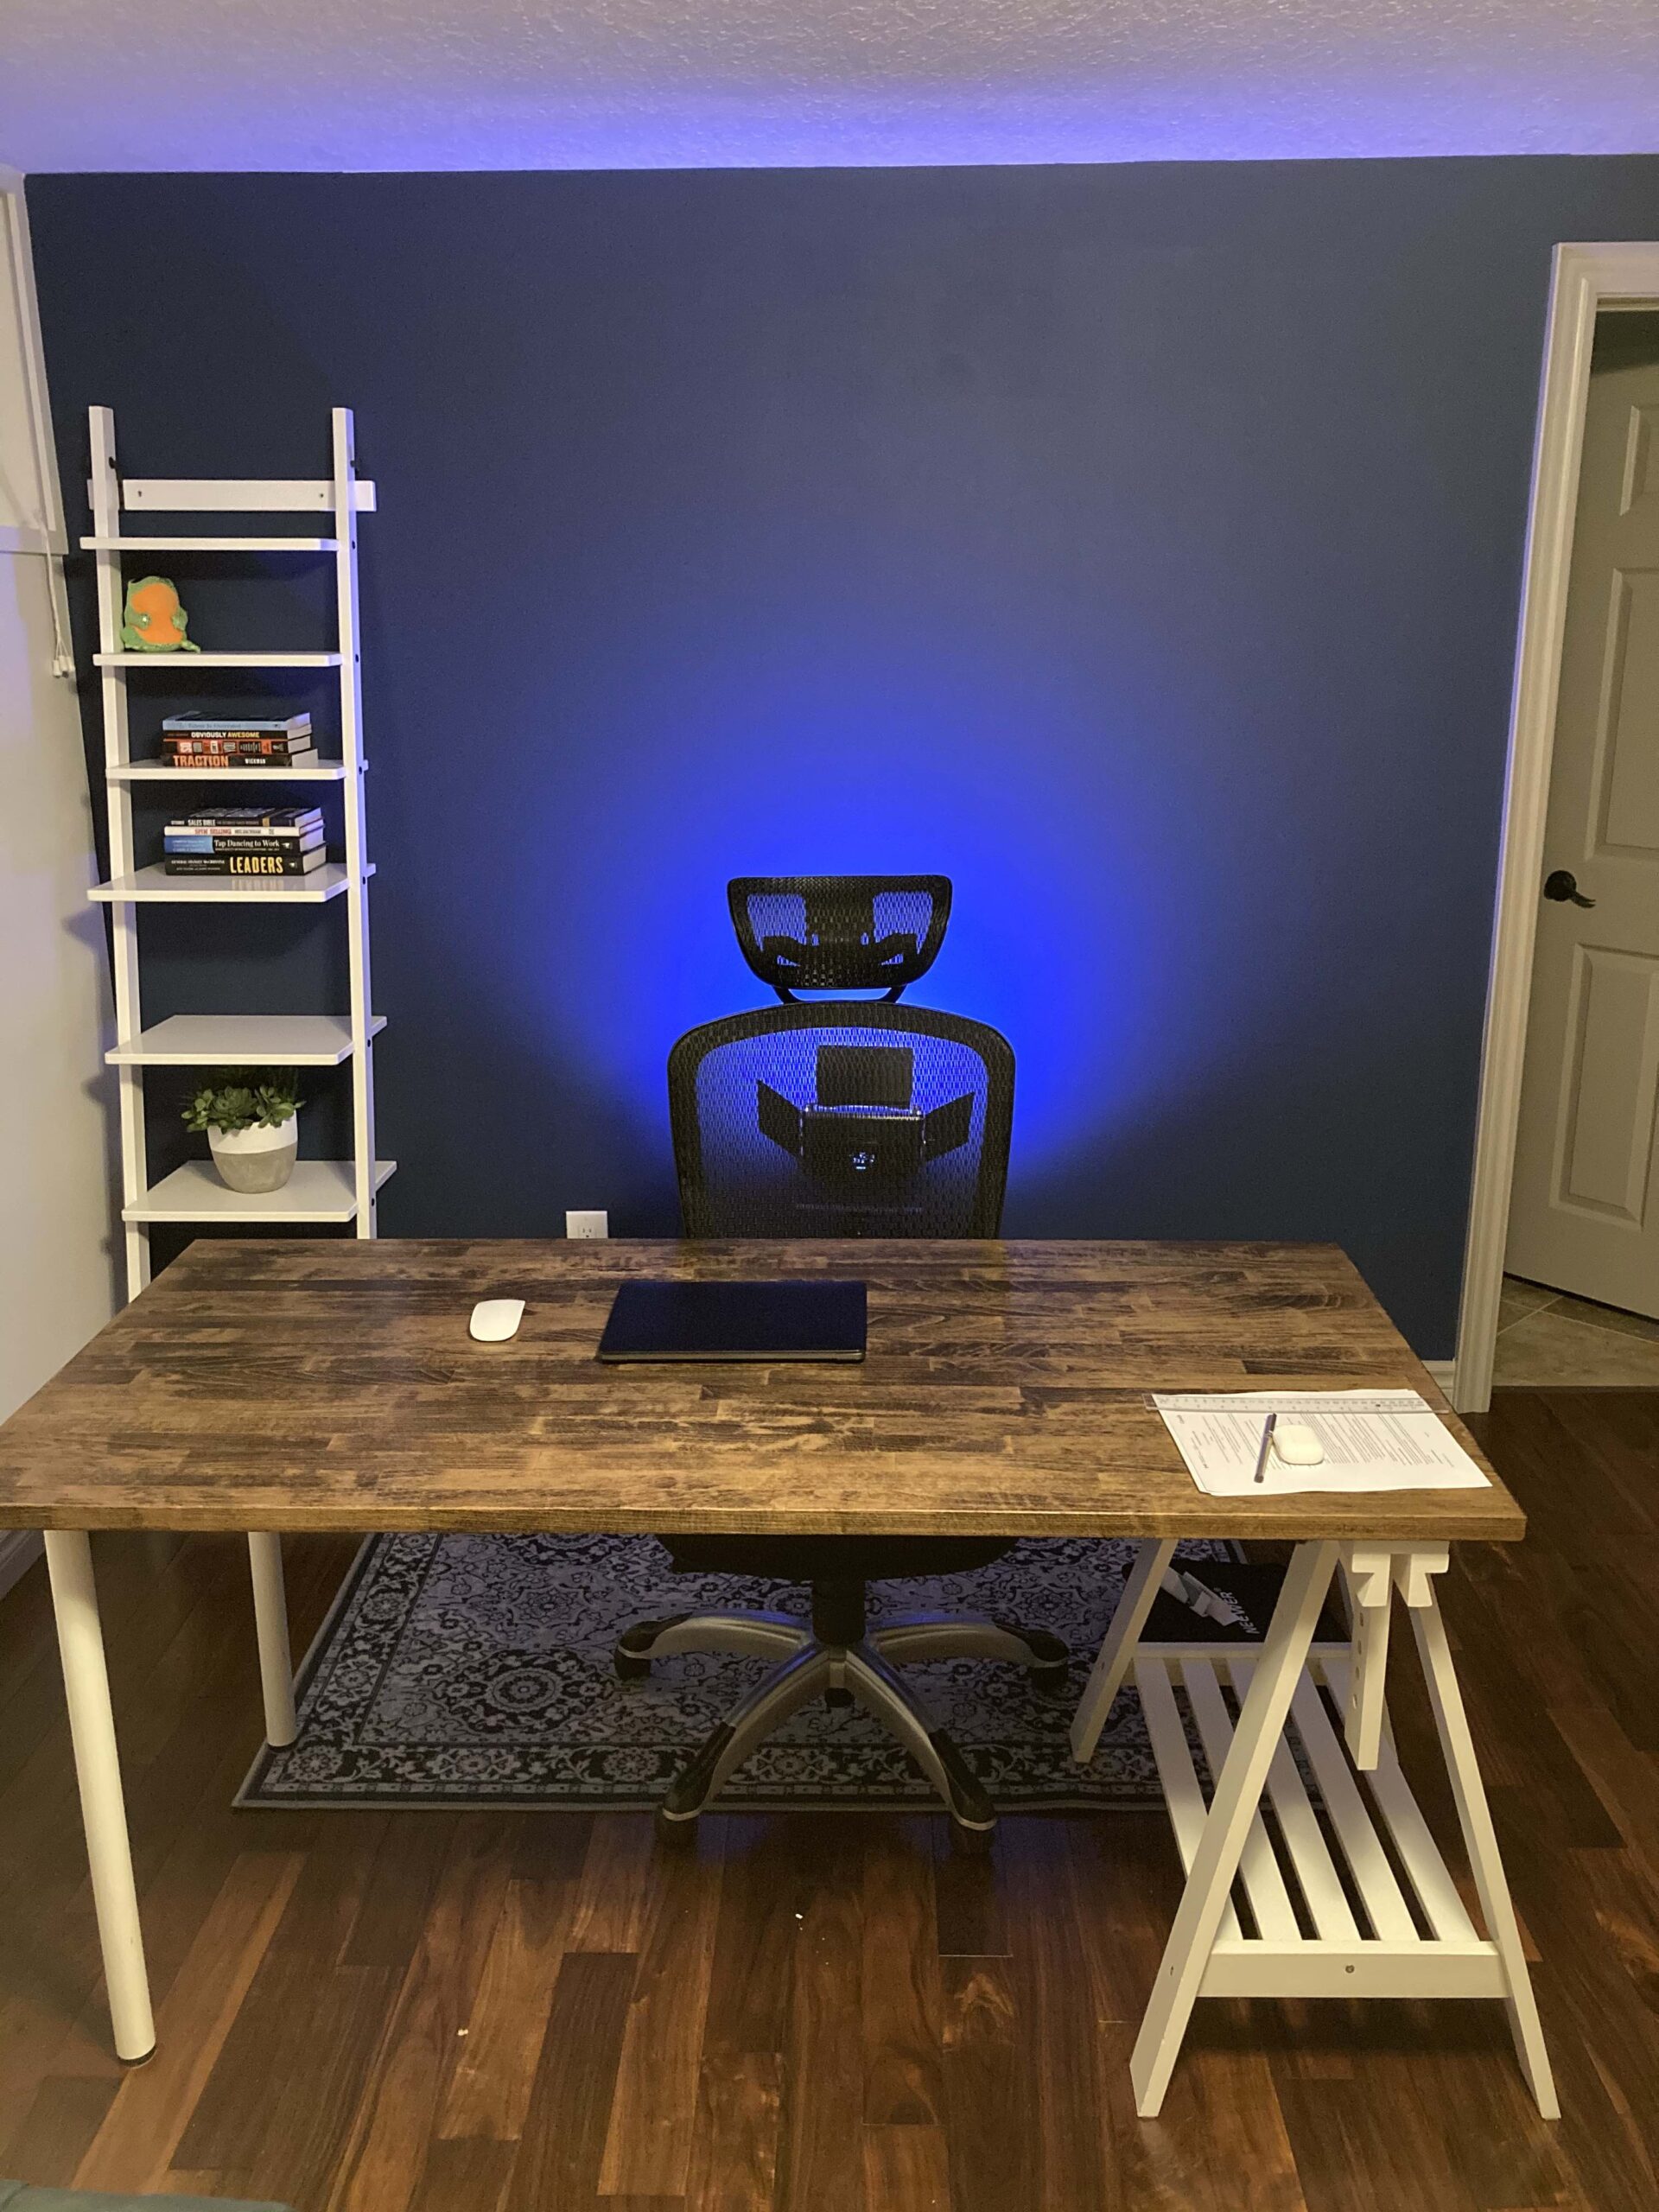
Setting up the Room
At the start, I did a lot of homework to determine ‘what great could look like’ for an online course(I wrote a separate post on this). I also dove down the Youtube rabbit hole to find home office / studio setups that I liked, yet seemed attainable on a $5,000 budget and without a background in video production. Having found a few great ‘analogs’, I went about converting my home office.
Desk
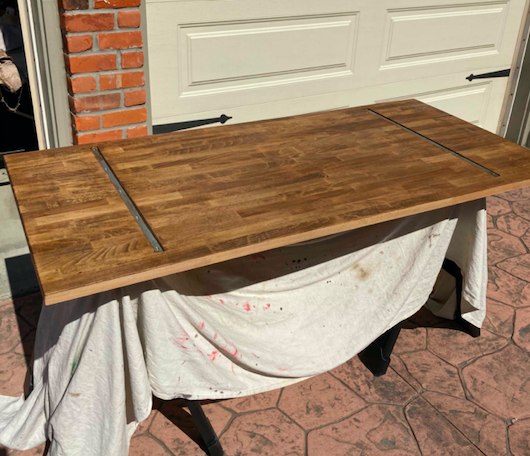
I had an existing Ikea Gerton Desk ($139), but wanted to freshen it up so I sanded it, stained it in a Dark Walnut colour, and sealed it with a few layers of Varathane.
This is the process that I followed: https://youtu.be/dpl6tCkKubs
The finished look made it look and feel like a new desk.

For me, one of the most challenging things about teaching online is keeping the same level of energy and enthusiasm that I would in-person. I couldn’t imagine ever presenting from a sitting position, so I invested in a PrimeCables electric standing desk convert kit ($350). This kit allows me to go from working at my desk to being in a standing position to teach in seconds.
Total Desk Investments: $524
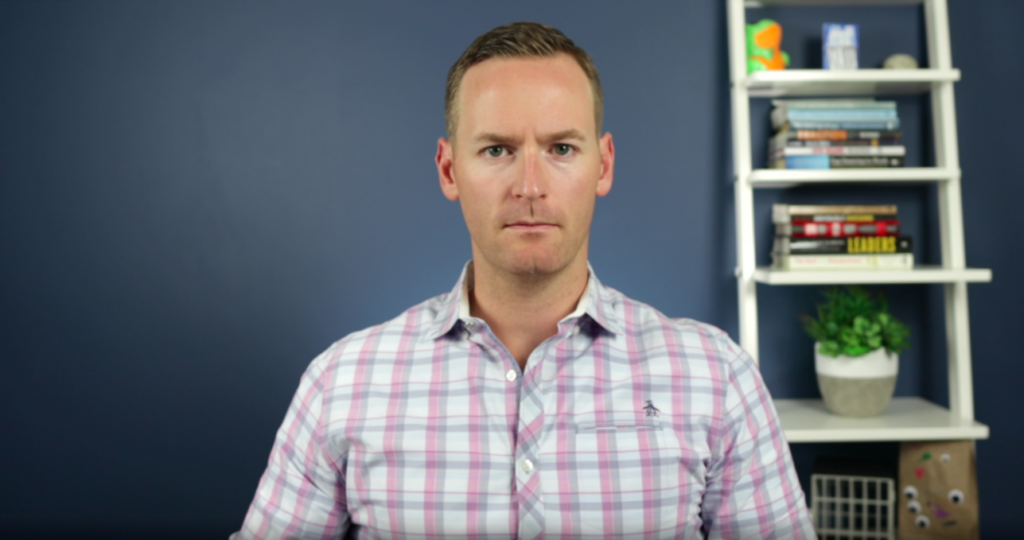
Background
After seeing several Youtube channels that I liked, I decided to keep it simple and paint a dark blue background – for no other reason than I like the colour blue.
In some of the Youtube channels that I liked, I noticed that the backgrounds were lit up using an LED light, so I purchased a Neewer LED Backlight ($130) and Backlight Stand ($30). This light allows me to change the colour from a bluetooth-connected app on my phone.
Finally, I stole a leaning bookshelf from my kids’ room, and added some books to make it look like I knew what I was doing and add something visually interesting to the background.

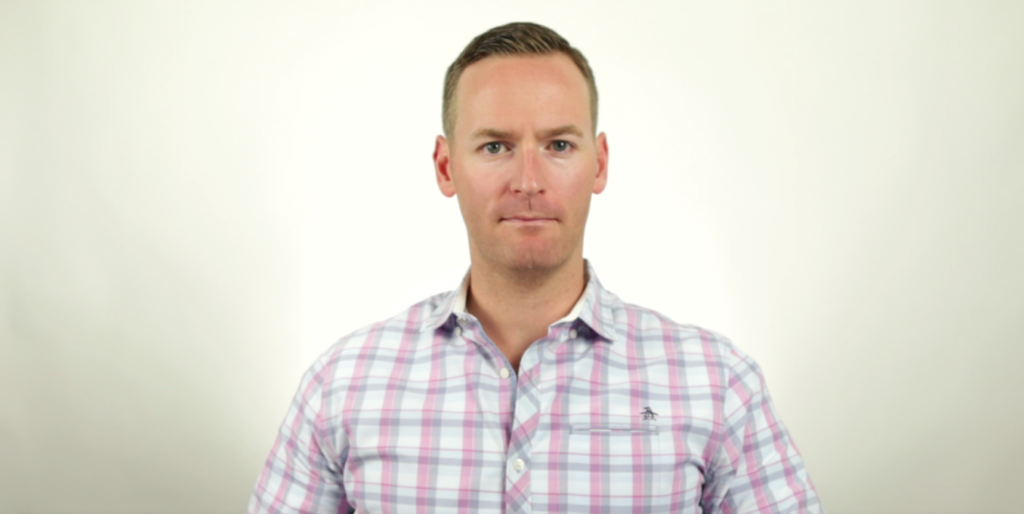
I wanted the ability to have a second ‘look’ (or alternative background) so I purchased a roll of white photo paper from Henry’s ($100), and a wall mount support system ($45).

Total Background Investment: $340
Lighting
I’ve learned a lot about lighting, but in truth most professional videographers will forget more than I’ll ever know about how to use proper lighting in a video.
Since my office had two large windows, I needed to find a way to block out the light. Knowing that I would eventually need to reduce the echo in the room I purchased full-length Amazon Basics Blackout Curtains ($40). I used a Grommet Kit $30 to add grommets so that I could flush-mount them to the wall – allowing me to block out all light from the windows.
For the video lighting, I did enough homework to learn that a ‘three-point’ lighting setup was the standard.
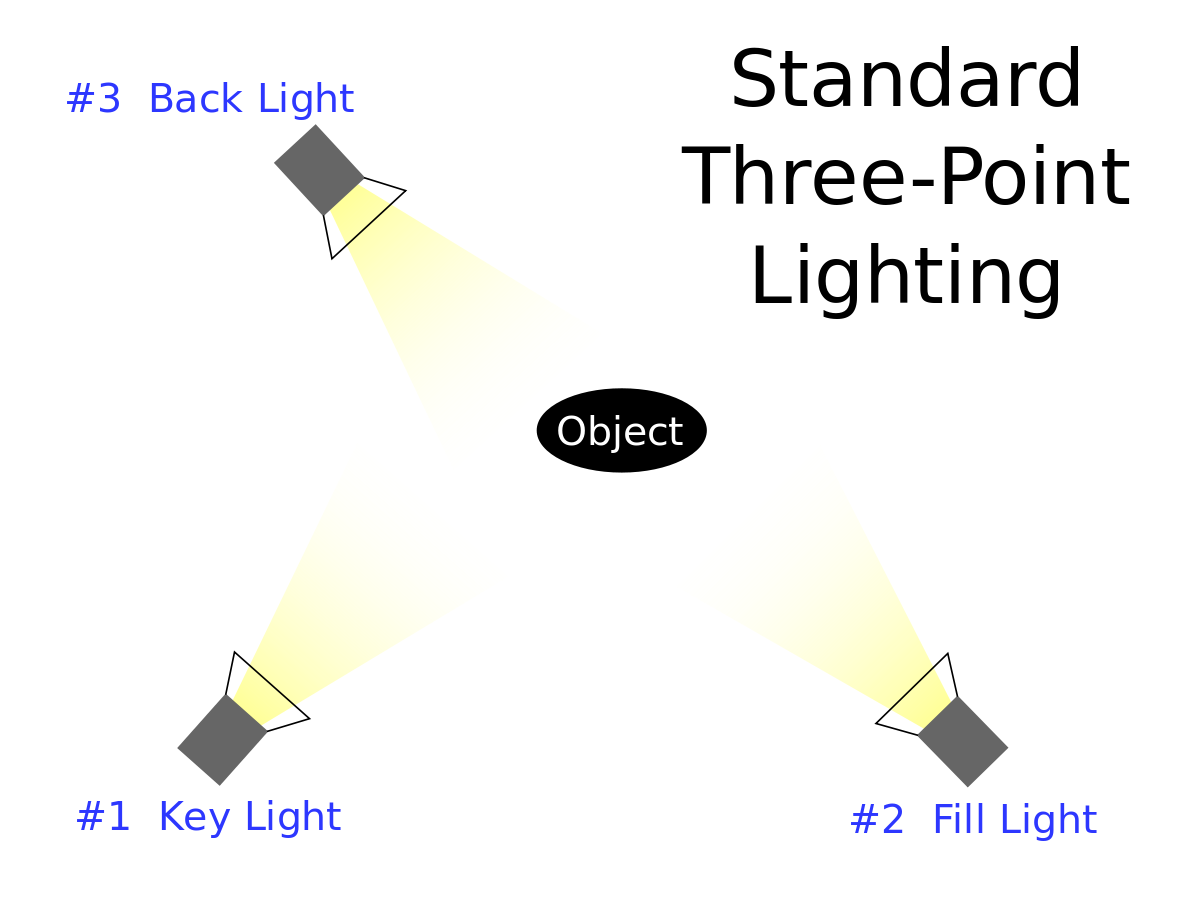
At first, I tried to create my own lighting setup using some lamps that I had in my office. Which, of course, was a complete failure. The lighting was too dim, and the background was dark.
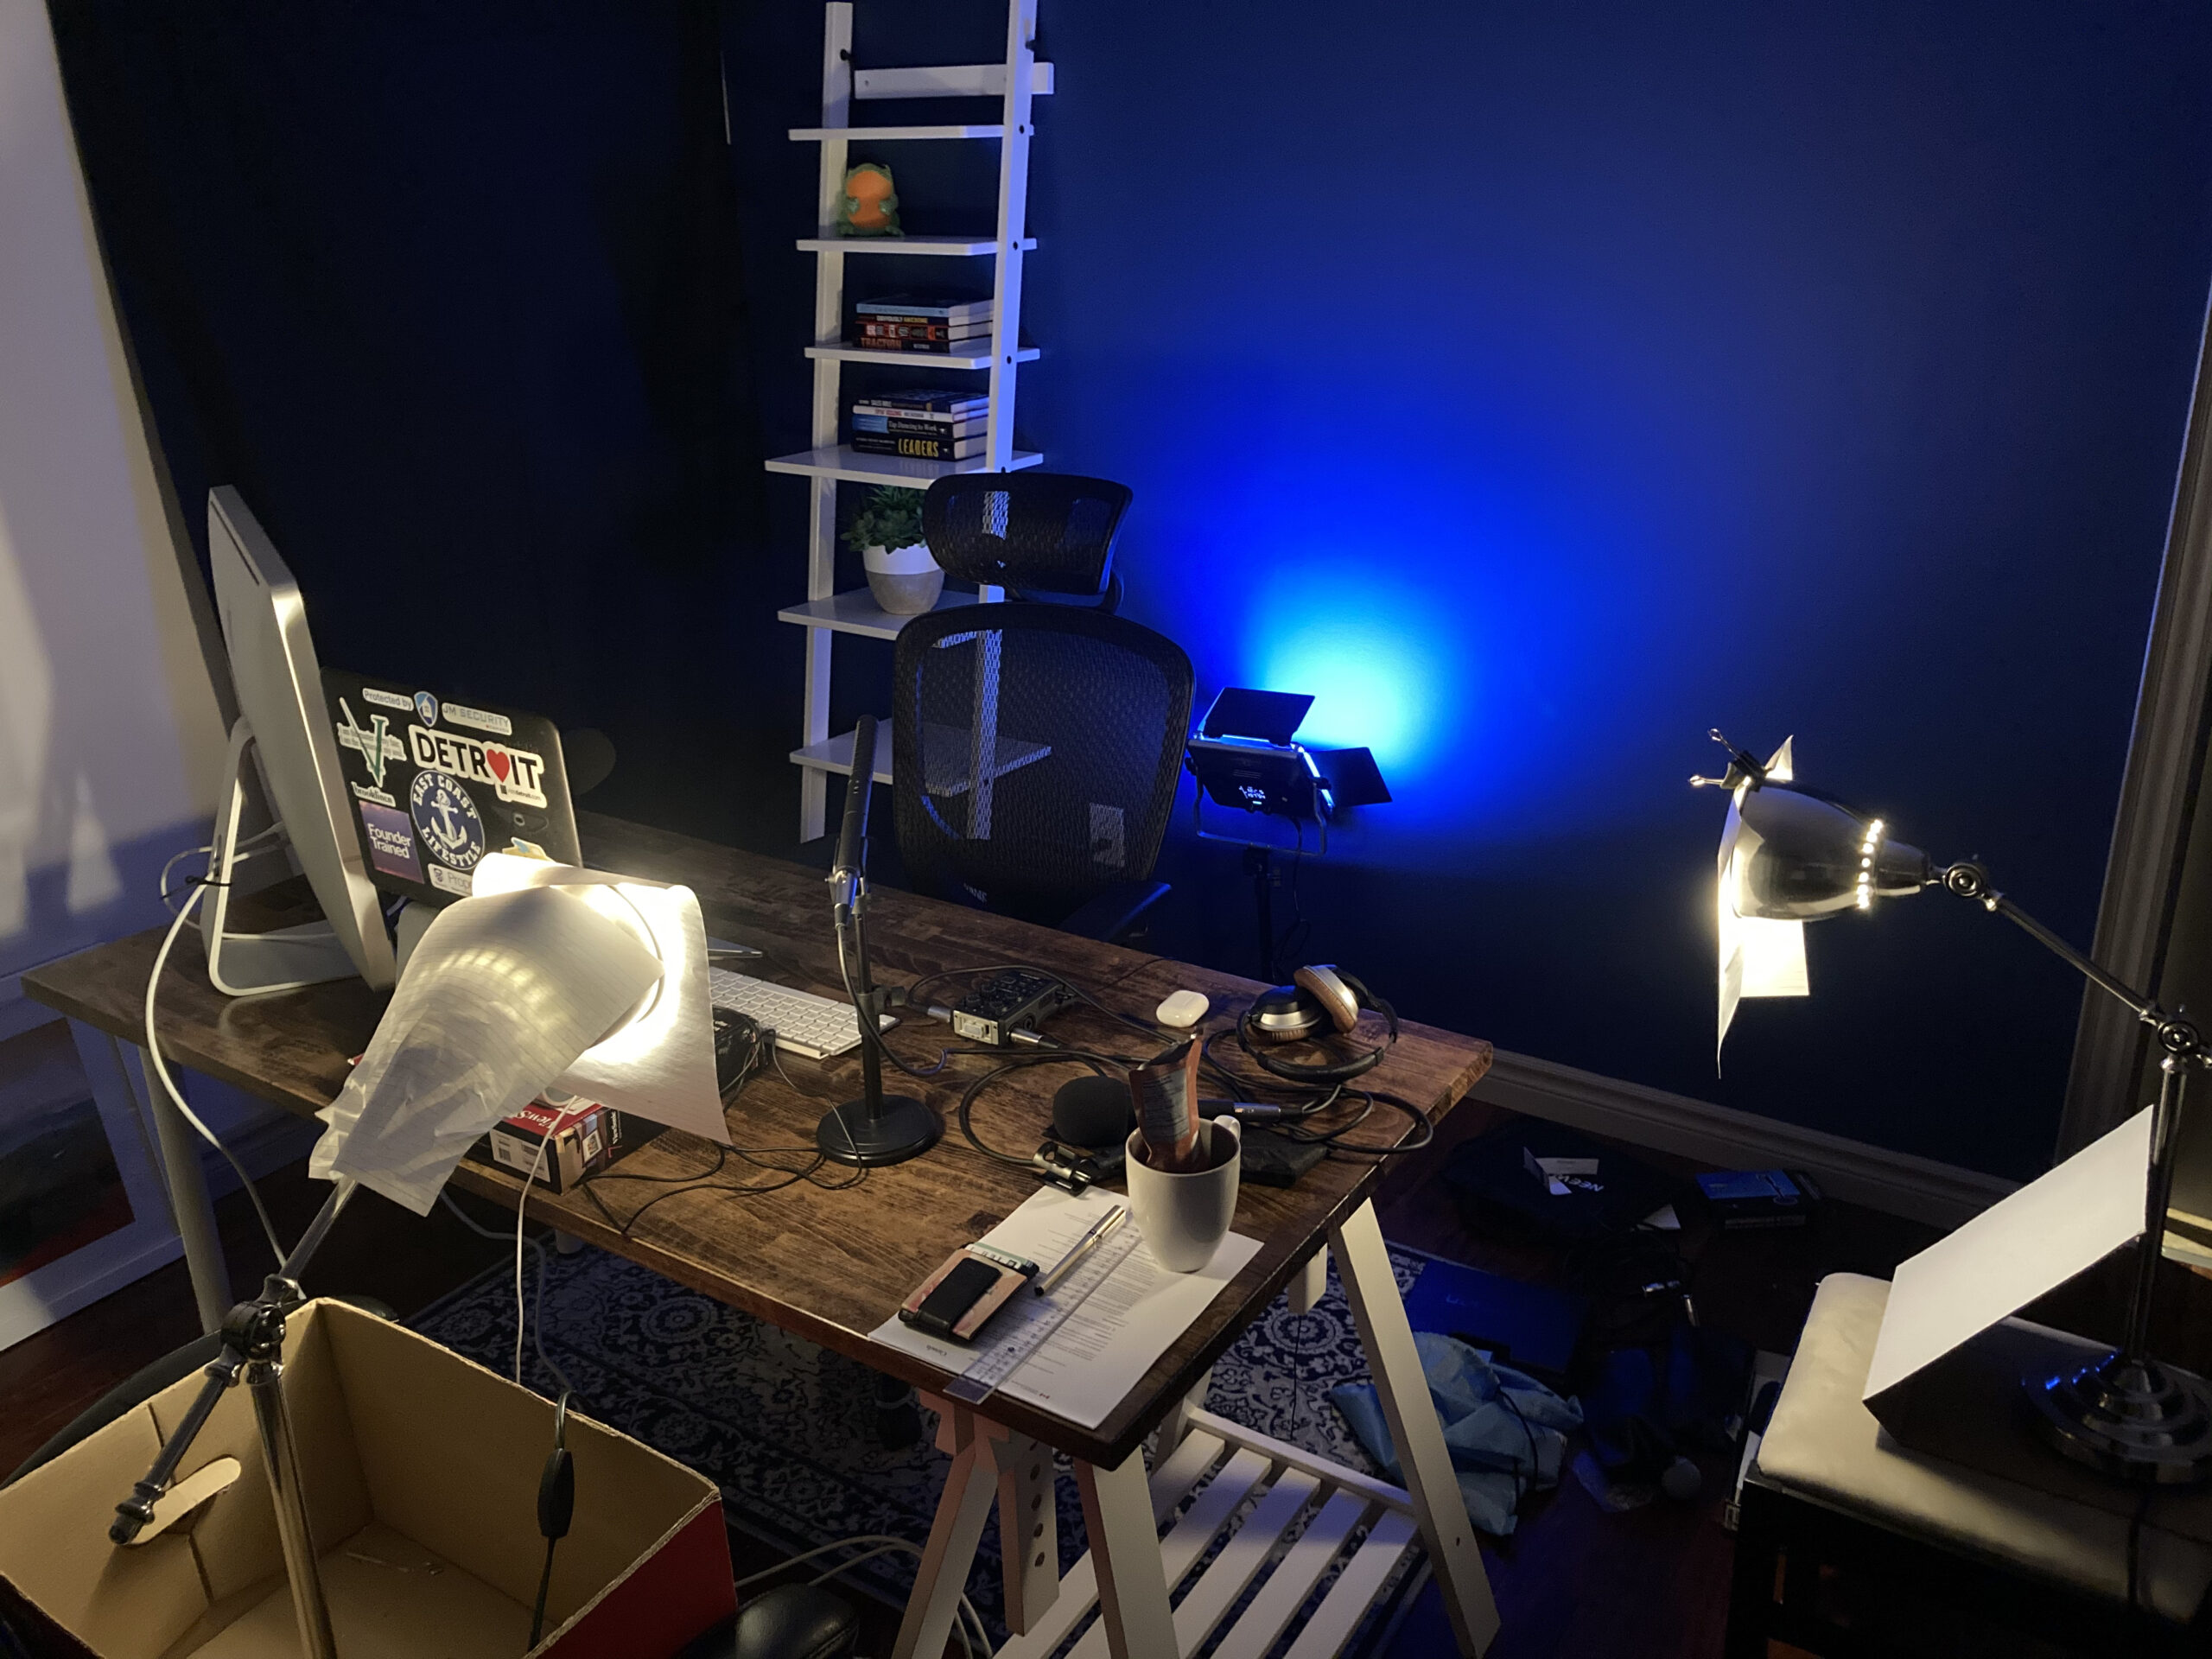
Ultimately, I opted for a relatively cost-effective option and purchased a Mountdog lighting kit from Amazon ($100).
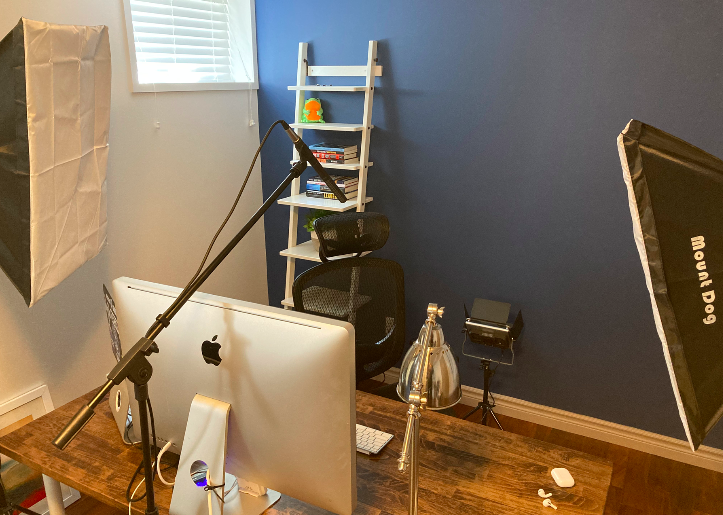
The lights were quick to arrive and easy to set-up, but I found them incredibly bright – especially as they reflected off of my blue background. To fix this, I purchased a Honeycomb Reflector which didn’t quite fit the lights and failed to accomplish my desired effect. I returned the reflector and found a great solution in a Neewer Reflector ($45), held in position directly in front of my fill light with a Reflector Stand ($25) and Clamp ($40).
Total Lighting Investment: $280
The Basics: Internet, Video, and Audio
Internet
TL;DR: Upgrade your internet to the fastest speed that you can.
A fast internet connection is a required utility for most modern households and is critical for those teaching online. In the past, I was speed testing 30 MB/s download, and 15 MB/s upload which is good but not great. At this speed, I was having difficulty maintaining live video and audio feeds with multiple devices connected in our house at one time.
Step 1: Start at the source
I called my ISP (Teksavvy) and upgraded from a 30 MB/s package to their top-tier in my area (150 MB/s). This required a hardware upgrade on my modem which Teksavvy mailed to me at no cost.
Investment: Upgraded Internet Service +$17/month
Step 2: Get a stable connection
To ensure a stable connection throughout our home, I had previously invested in a mesh Wifi network: basically an upgrade to a standard router which increases your coverage area and makes your connection more robust. In 2018, I purchased the AmpliFi system and have been extremely satisfied. However, for online teaching needs, I recommend a simple hard-wire connection directly to your modem, which costs ~$25 vs. $500 for a new router.
Video
Trying to sort out my video has been the longest (and by far the most expensive) part of this entire process, and if you want to save time (and ultimately money) my suggestion is to talk to an expert. I was introduced to Andrew at Stature Films, who recently put out a Work from Home Series: a free course dedicated to improving your video at home.
After an introductory conversation with Andrew, I invested $250 for a one-hour consultation with him where he walked through my entire setup, made recommendations for upgrades to my equipment based on my budget, and even helped adjust the settings on my camera in real-time.
Unfortunately for me, I made the decision to do this consultation after I’d spent weeks trying to figure things out on my own, and my recommendation would be to do this right upfront.
V1: Built-in Webcam
Built-in webcams are sufficient for 99% of users but fall short if you teach online professionally. The automatic colour adjustments, and focus, ease of use, and simplicity of a webcam can’t be beat. However, I found the overall quality to be low, the image to be shaky, and often the colour adjustments to be over-compensated.
V2: Old DSLR
Based on my early homework, I found that most Youtube channel operators (“youtubers”) were using DSLR cameras to film their video. I had a Canon EOS T3i with kit lens which I purchased almost 10 years ago and since it’s a great camera for taking pictures, I figured I was all set.
Using a DSLR as a Webcam
To use a DSLR as a webcam, you need something called a capture card which captures the video feed from the DSLR and puts in into your computer. I did a lot of homework here, and purchased (then returned) several devices before ultimately investing in the BlackMagic ATEM Mini Switcher.
I tried several ‘cheaper’ versions including:
- Mirabox Capture Card ($150) – …a piece of garbage that drastically reduced my video quality – returned immediately.
- Blackmagic Mini Recorder (Normally $150, currently $350) – Borrowed from a friend but it used an old Thunderbolt connection
- Elgato Game Capture ($185) – Most popular with gaming streamers, expensive for what it is and sold out everywhere!
After extensive homework, I spent $500 on the BlackMagic ATEM Mini Switcher mainly because it was in-stock, but also because it was the most affordable option for a capture card with advanced functionality that I could grow into, like:
- The ability to add multiple cameras in the future (the other capture cards above allow one)
- Clean transitions between desktop share / video feed
- Ability to do picture-in-picture with the press of a button
- USB 2.0 connection for Mac
Unfortunately, once I figured out how to use my DSLR as a webcam, I realized that a lot has changed in 10 years. The older versions of DSLR cameras weren’t built to record video in HD, and my entry-level camera had limited ability to adjust the colour of the video feed.
In my consultation with Andrew, his recommendation was something to the effect of:
The best investment that you can make in upgrading your teaching studio is purchasing a new camera with a good lens.
…and so…
V3: New DSLR Camera
After a lot of research, I found a great camera at a reasonable price used by a large number of Youtubers in the Canon EOS M50. The new DSLRs are called “mirrorless” meaning that a lot of the hardware has been digitized, making the body much smaller. I had decent familiarity with Canon products, and my consultation with Andrew validated that this camera would be something I could use for years to come.
For this purchase, I actually went analog and visited a local camera store called Henry’s. They had a floor model of the Canon M50 available immediately for around $650.
Most of the DSLR cameras are built for shooting photos and come with a rechargeable battery, but not the ability to plug the camera in for constant power. I purchased a ‘dummy battery’ adapter kit($25) to solve for this.
To plug the camera into a laptop, I needed an HDMI to micro HDMI cable ($15).
Lenses
Turns out lenses can make or break a great photo or video – this was news to me. Unfortunately, buying a good lens can (and often does) mean spending more on a lens than on the camera itself.
Given that my studio had limited space, I needed a fairly wide-angle lens to create good depth of field (the ‘blurry background’ effect referred to as bokeh). I found a popular lens that Andrew validated would suit my needs in the Sigma 16mm F1.4 – also purchased at Henry’s.
Hint: Lower F-rating = more ‘bokeh’
Total Video Investment: $2,060
Mounting
To mount the camera, I originally purchased an Amazon Basics 60-Inch Tripod ($30) – which did the trick. I was tempted to invest more than $30 given that the Amazon Basics version felt light, but in speaking to several videographers, they said that unless I was moving the kit around frequently, the $30 version would suffice.
The challenge with the stationary tripod was that when I adjusted my desk to the standing position, the tripod couldn’t extend high enough. So, I decided to mount my camera to the desk itself using an Elgato Flex Arm Kit ($70) and Multi-Mount ($100).
For a long time, the Multi-Mount was sold-out, and I had planned on making my own camera mount using a Vivo Monitor Arm ($50), Tripod Extender ($30), and Tripod Head ($30). However, when the Multi-Mount became available, I returned these.
Total Mounting Investment: $200
Audio
A few years ago, I started the Ivey Entrepreneur Podcast and wanted to invest in a good, portable audio recording system. At the time, I purchased the Zoom H6 ($500), and several SM58-LC Cardioid Vocal Microphones. I found a resource that explained how to convert the Zoom device into an audio interface/mixer for use in live video which is what I use today. Reflecting back, I could have saved $200 and purchased the Zoom H4 ($300) to accomplish the same result.
For my microphone, I use a Rode NTG-2 Shotgun Microphone ($300), mounted on an Amazon Basics Tripod ($30), and connected using XLR Audio Cables ($10).
Total Audio Investment: $840
Nice to Have
- Elgato Stream Deck ($200): This device is used by a lot of video game streamers for ‘shortcuts’. It’s a clever hardware device that sits on your desktop and allows you to program it for one-touch video overlays, audio drops, and hotkey options (mute all, share screen, etc.)
- Samsung 32″ Curved Monitor ($250): Until recently, I was using an old iMac from 2010 converted into a monitor, but the new Macbook Pro doesn’t have a DisplayPort. I opted for a larger size because I wanted to find a way to see as many students at once on a screen and because this one was $100 off when I bought it. Since I also use my studio desk as my home office, I needed a way to swivel the monitor into place when I was working, and out of the way when I was teaching so I purchased the highly rated Amazon Basics Monitor Arm ($150)
- 55″ Flat Screen TV (previously owned): Since I use Keynote a lot when I’m teaching, I wanted a way to present without constantly looking away from the camera. So, I used an older 55″ LCD TV mounted on TV Cart ($120), and positioned it directly behind my camera about 15′ away at the back of my office. To mirror my screen, I purchased an HDMI splitter ($30). Now, I can view my presentation as if it’s on a projector but still appear as if I’m looking presenting into the camera.
- Glide Gear Teleprompter ($300): A lot of Youtube channel owner/operators actually script their videos. While I don’t plan on using this for my courses, I do plan on using it for other Youtube videos in the future and have already used it to film some videos for my business. I’ve experimented with different teleprompter apps, and found the Prompt Smart Pro App($25) to be best.
- Mobile Phone Stand/Desk Mount ($40): For an affordable “second camera” I used a desk mount to hold my iPhone, and downloaded an app called EpocCam. This app simply turns your phone into a webcam which can easily be selected in Zoom to be able to show me writing on a whiteboard (for example).
- E-Camm Live ($15 Monthly Subscription): E-Camm turns normal conference calls into livestreams. The program works well with Zoom, and allows me to easily insert graphic overlays, and audio into the class. Recently mmhmm seems to have come out with a similar offer, and I’m currently awaiting access to their private beta.
- Misc Cables / Dongles / Organizers ($180): I needed several extension cables, adapters, and dongles, and since my teaching studio also doubles as my office, I wanted to clean up all the wires and cables so I purchased several cable storage boxes, and cable organizers so that my desktop doesn’t look like spaghetti.
Overall
In total, I spent $4,905 since I’d already owned the desk, TV, and Zoom H6. The actual ‘raw’ total of these investments to repeat this setup from scratch is $5,994.
The top investments that I would make would be having the consultation with Stature Films earlier in the process which would have saved me a lot of time in researching this on my own. Following Andrew’s recommendations (owner of Stature Films), the single most impactful investment would have to be the DSLR camera and lens. With a cheap desk, paper background, and a ring light, the high-quality DSLR camera and Sigma 16mm lens would still work like magic to give the entire setup a professional look and feel.
Biggest Waste of Time
I spent a lot of time on cosmetic updates (painting, finishing my desk) that really weren’t necessary in the end. Viewers will never actually see the desktop, and with a paper background backlit with an LED light, I could have saved at least a day of effort.
Biggest Waste of Money
While I love my audio setup, a Zoom H6 is overkill. From what I now understand, an H4 is more than enough for my needs for teaching and the podcast, and if I wanted to I could simply plug the audio input into the ATEM Mini and that would be sufficient. This alone would save between $200 and $500.
The ATEM Mini, while the right investment for me is also overkill. The Elgato Game Capture card (when in stock) is a third of the price and would probably get the job done for most people teaching online or starting a Youtube channel.
Finally, the teleprompter (at least at the moment) was completely unnecessary. My biggest reason for this purchase was because I do plan on filming more short Youtube videos, and a lot of this equipment is in high demand and is already, or will be sold out shortly.
All of these together would cut ~$700 out of the budget without sacrificing quality.
What would you invest in with a $1,000 budget?
If I could suggest a simplified version of a home teaching studio, I’d actually cut out the DSLR altogether, and would simplify the lighting and audio setup. Here’s what I’d recommend on a $1,000 budget:
- High-End Ring Light ($325)
- Webcam ($194)
- Blue Yeti mic ($150)
- Paper background ($100) and Mount ($45)
- LED backlight ($130) and Stand ($30)
Total Investment: $974
What would you invest in with a $100 budget?
For a completely simplified version, I’d cut out any external webcam and use the built-in webcam on most laptops. While I have a Macbook Pro that I use for work, I still mostly use a 2015 Macbook Air and the 5-year old webcam is still sufficient for video, and the auto colour balancing is really helpful for lower-light conditions. However, I assume here that you want to upgrade to an external webcam. Here’s my recommendation for a $100 budget:
- Computer cam / iPhone (free)
- Saitor Webcam ($40)
- 10″ LED Ring Light ($40)
- Professional Lavalier Lapel Mic ($22)
Total Investment: $102
For a link to the full list of products for each budget, I’ve put together a Google Doc here.
If you found this helpful, please share. Let’s make teaching online a great learning experience.
Special thanks to:
- Andrew Sorlie from Stature Films for being my sherpa
- Caleb Pike from DSLR Video Shooter (Youtube Channel) for the detailed explainer videos
- Peter McKinnon (Youtube Channel) for sharing your studio setup details
- Eric Silverberg and Eli Gladstone from Speakerlabs for recording a podcast episode with me to talk through why it’s hard to communicate digitally and how technology can help you overcome those barriers